future blues

Today I refreshed the indigo vat with a new jar of starter solution, and while it was reducing I took today’s projects to be dyed out to the backyard to document the “before”.

a loose cotton dress with short sleeves, in a small blue and pink floral print, hanging against a seafoam green steel garden shed

The first is this old dress from a former life. I made this some time in the early 1990s and despite its ill fit I wore this thing A LOT. I even wore it to someone’s wedding although I can’t remember whose. It was ankle length then, with long sleeves, but I eventually shortened it. A couple of years ago I found it up in the attic. It’s going to get overdyed with indigo, then I’ll cut away all the fabric leaving just the seams behind. These seams will be stitched down onto the Two Sisters portrait quilts to “draw” their garments. It’ll make more sense, I hope, once the pieces start coming together.

Is a garment made in the early 1990s considered “vintage”? Because it feels awfully weird to have a vintage dress I made myself.

The second piece going in the indigo today is this tie-dye cotton shawl, a project I worked on over several weeks at my sewing circle. It’s a beautiful, very large cotton mull shawl from the Maiwa shop (link: Maiwa natural dyes) that I mordanted with myrobalan tannin and alum before deciding to use indigo, which doesn’t require a mordant but that’s okay because the parts that don’t get dyed will be this soft myrobalan yellow instead of bright white.

a pale yellow shawl hanging against a seafoam green steel garden shed

I marked out a staggered grid over the whole shawl and tied a tamarind seed in at each grid point. I kept track of the time while doing it; this is 10 hours, 20 minutes of tying seeds into cloth.

a pale yellow shawl hanging in a cherry tree

This piece looks so beautiful just tied like this, so I took lots of pictures. Here’s a closeup of the tied in seeds:

a panel of pale yellow fabric with seeds tied into it in a grid pattern

And here’s the back side. I love how the staggered grid pulls it in to look like some kind of glorious combination of smocking and sashiko.

pale yellow fabric with seeds tied into it

red transom

white fabric in an embroidery hoop with woven stitched diamonds in shades of red

These diamonds are worked like darning, but employed as embroidery on cotton fabric. I’m using embroidery floss, which as you can imagine is a real pain in the ass. I’m constantly having to pull out and redo rows of weft because of failing to get the needle over or under a single strand of the 6-strand floss. I think the final product will be worth it, but wow, this is tedious. I work at it a little bit several days a week and it’s going to take months to complete.

white fabric in an embroidery hoop with woven stitched diamonds in shades of red

This is part of a six quilt series I’m working on for my upcoming two-person exhibition with Lisa Sylvestre (link: asil) in September. The works are, in part, about memory and comfort, as all quilts are in a way about memory and comfort. These quilts will depict a particular space in a particular room, drawn and stitched from memory in different states of abstraction. I’ll write a lot more about these over the coming months.

This panel of diamonds is just one method I’ll use to illustrate a red transom window in that remembered room. It’s going to be the slowest part of the whole project, which is why I’m working on it every day. This will eventually be pieced together with other fabrics (including the linoblock printed brocade, which is the wallpaper in that room of memory) and quilted along the lines that separate the diamonds. The real life red transom did not have a diamond pattern; it may have had a floral diapering pattern or it may have been plain red glass, but I can’t remember and every time I try to call up the image in my memory it shifts, which is all part of how memory works and also why the window will be drawn many different ways in the quilts. Some, but not all, of these will have portraits. All of them will have plants.

in progress: dogwood quilt

This is a fun project Peter and I have been working on together. It started when I was sitting on the porch watching some neighbours hanging out their rugs to dry over their porch railing. I thought the tile pattern on the rugs looked like a fun quilt block design, so I grabbed my notebook and sketched it out.

a pincushion, red thread scissors, coffee cup, and pencil with grid paper notebook open to a drawing of a tile pattern

Of course as a printmaker I was stuck in the usual rut of a grid-like small pattern repeat, until Peter took the pencil and started shading the tiles in the shape of a large four-petalled blossom. Then he said, “this is the quilt I want on our bed”.

He later sent me a photo of a dogwood tree on campus, with the blossom colour we’re putting in the quilt.

closeup on pink and white blossoms on a dogwood tree

Here is the colour sketch of one full repeat, with a map to the blocks that make it up. These blossoms will be quite large, at least the size of a vinyl record, and tumble in a repeat over the whole quilt on a background of mixed indigo fabrics.

a colour sketch of a floral quilt block in a grid paper notebook

And here is a test block I made just to try out the scale for the blossoms. I’ll try for better precision in joining the pieces on the real quilt (these pieces were torn in rough strips rather than cut carefully). I tend to prefer simple variations on basic blocks like snowball and log cabin, so this is probably the most fiddly quilt I will ever make.

a quilt block in a large 4-petalled flower design, in gray-pum, coral pink, and off white fabrics

The actual quilt will be mostly indigo, with a slightly off white achieved by simmering the cloth in coffee, and a hot pink from cochineal and sappanwood.

two sisters

hand stitched portraits in progress, lying on an ironing board

I’m finally back to working on those stitched portraits I was playing with a while ago, making up a couple of small quilts to test out some processes I’m hoping to use in some bigger work later this year. These two small studies will be part of an upcoming exhibition to accompany a jazz festival at Mackenzie Hall this summer. The larger quilt works that these are serving as practice for will be exhibited in September. I’ve got a lot of quilting to do this spring and summer!

yellow and white fabric pinned together with a stitched drawing of half a face showing

I’m hand stitching the portraits onto a colour blocked background of various naturally dyed cottons and some of the white-on-white brocade I printed recently. These will be composed like formal portraits, and each figure will be holding a potted plant. No conceptual reason for the plant, it’s just an exercise in making stitched plant portraits, again practice for those larger works to come, for which there IS a conceptual reason for the plant. Phew.

a hand stitched portrait in progress, white face with blue hair on a yellow and olive background

Despite the blue hair, this isn’t a self portrait.

white noise in a white room

a carved linoleum block sitting next to a graphite rubbing of the block on paper, with carving tools scattered around

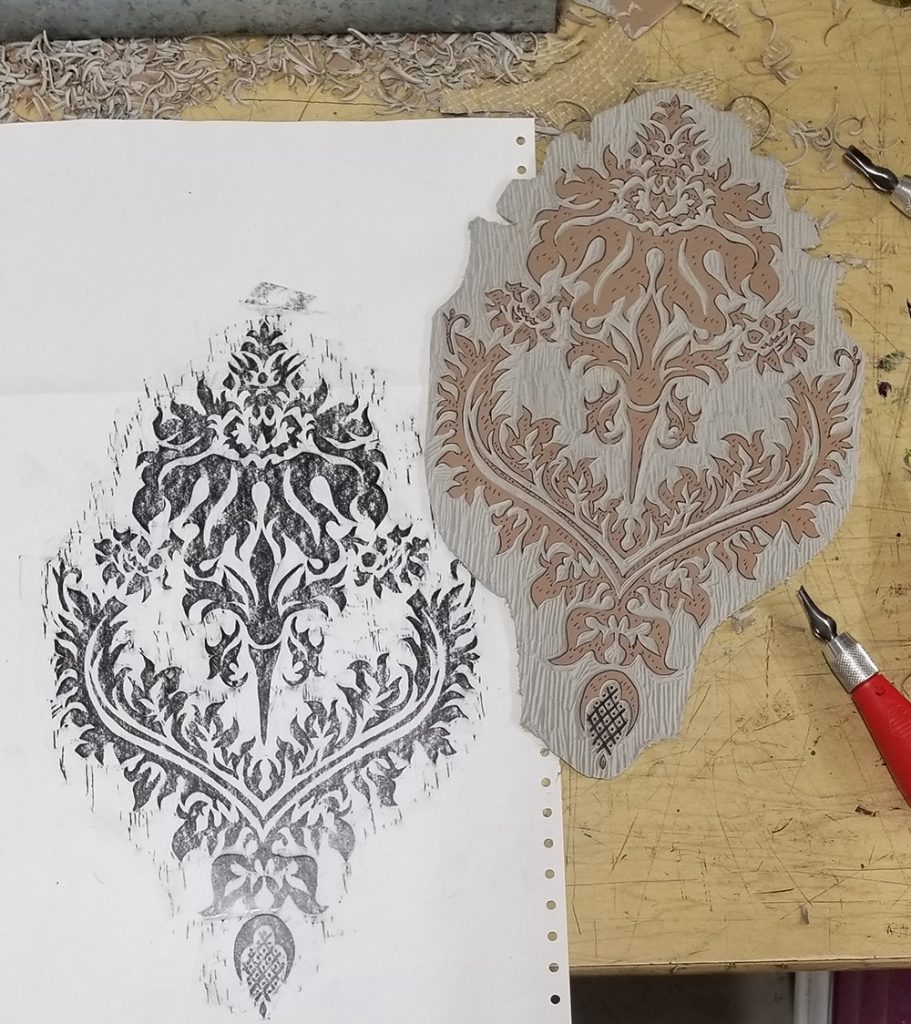
Here’s something fun I’ve been working on recently. It’s a lino block of one repeat of a brocade pattern for printing on fabric.

I needed some white on white, or nearly white, brocade fabric for a quilt series I’m working on (for an exhibition in September, more on that later). It’s not the exact pattern but it meant to represent the white brocade wallpaper in my maternal grandmother’s living room. This particular pattern is taken from a certain style of gold brocade drapes from the 1970s that must have been everywhere, based on the sheer volume of them my partner and I used to find in thrift stores in the 90s. Those were our Society of Creative Anachronism years, and I still have my glorious Russian shuba (full length overcoat with “fur” trim) made from this, as well as a beautiful but unfinished court sarafan hanging in my closet. My ulterior motive for using this pattern for my quilt project is that I will be able to print other fabrics with the block later on, in particular a set of old fashioned pinch-pleated drapes for our bedroom.

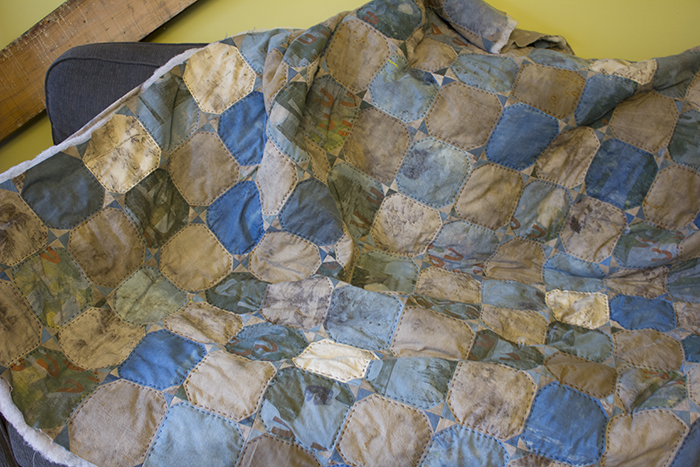
For now, though, I’m printing it in white on a variety of not-white fabrics, mostly thrifted cotton bedsheets, that I’ve made not-white by boiling in coffee (the absolute easiest and best smelling way to make white just a little less white) and a more grayish not-white by adding tea and a bit of ferrous sulfate to the coffee.

a brocade pattern printed in white ink on off-white fabric

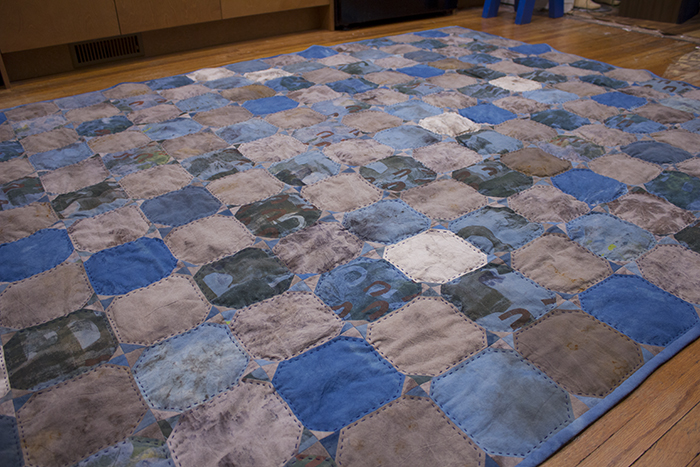
This was my first attempt, with janky registration and a hole in the fabric that I printed right over, and yes, this piece will probably end up in a quilt, hole and all. I’m not at all worried about the registration for this project, although I’m quickly getting the hang of getting the block lined up. There are things I could have done in the planning stages to make registration easier, but oh well. I’m kind of a messy printer at the best of times.

I didn’t do anything to clear out the chatter on the block, and I’m pretty happy with how it fills up the space between motifs in the fabric. Accidental marks are so often the best kind of marks, in printmaking.

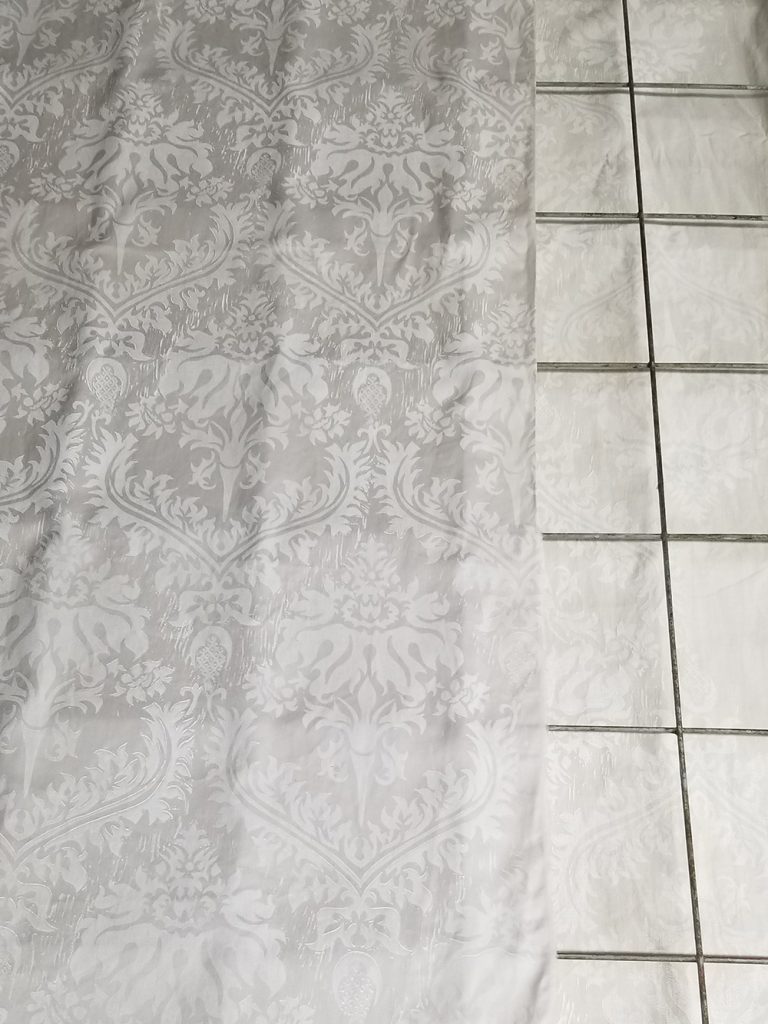
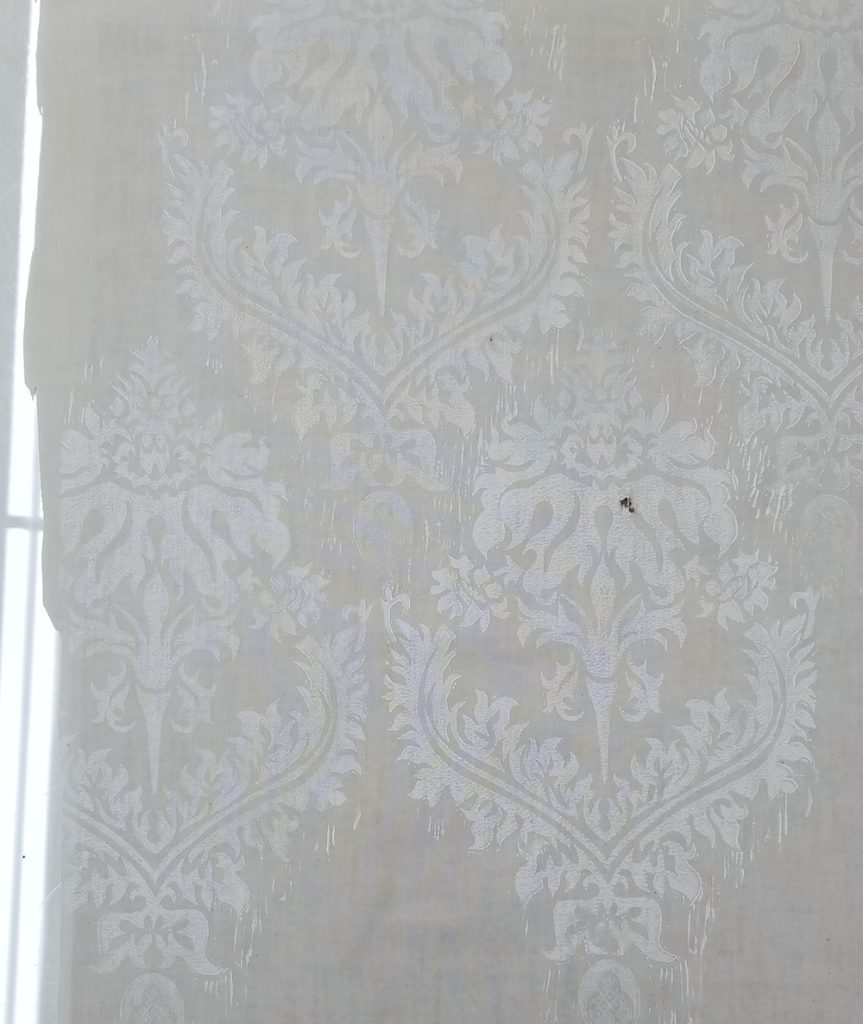
Here it is printed on the pale gray where the contrast is actually enough to be able to make it out on screen. The paler fabric is visible on the right, a level down in the drying rack.

pale gray and white brocade fabric lying on a steel drying rack

2025 daily stitch, day 29

25daily0129

I think I’ve decided how to make this project work for me over the upcoming year. I’ve been planning to start breaking up the longer chunks into small sections, adding just one section per day so that a single strip may represent a week or two rather than just one day. But while I love the look of long pieced strips in a big log cabin quilt, I’m also very much enjoying the rigid lines created by the folded edges of these applied strips, and don’t fancy the idea of those strips being broken up by folded edges crossing those strips.

30+ years ago when I was a wee baby art student in the Bealart programme (link: Bealart), majoring in printmaking and minoring in textiles, my textile instructor Nicole Crozier called me a “textilian in printmaker’s clothing”. When you see how much I’m currently condensing the footprint of the presses in my printmaking studio to make space for my natural dye operation you’ll probably agree. But still I’m a printmaker first, and we tend to work in multiples. I feel the best way to go forward with this project is to make a new block each month, but finish each off as a separate small quilt rather than waiting until the end of the year to assemble them into one large piece.

This project is about establishing and maintaining a daily practice, not so focused on what the final product will be, and so far this year I haven’t fallen behind once (in stark contrast to last year). I am a champion starter and not much of a finisher, and my projects tend to drag on, and on, and on. Stopping at the end of each month and taking the extra time to finish each block with backing and binding as I go will actually make the daily practice more valuable for me, a person always working on something but rarely finishing anything. And at the end of the year instead of one large quilt top needing to be quilted and finished, I’ll have twelve small finished works. And in 2026 I’ll be able to move on to the next Daily Stitch project with no loose ends.

This means only two more days’ worth of strips on this square and I’ll be ready to quilt it.

2025 daily stitch, day 13

My hand stitched log cabin is growing nicely.

25daily0113

It’s already clear that I’m not going to be able to just add strips every day all year to this block. I’ll soon run out of pieces from which to cut such long strips among the fabrics I have earmarked for this. So far it’s all been scraps from the dresses I made during my thesis work, The Wardrobe Project. I’ll switch to some other block printed fabrics when the strips get too long, but adding a strip every day will also make this thing far too big, too unweildy. A year of stitching every day is a lot of stitching so it makes sense that the finished piece be somewhat monumental, but it also has to be manageable.

I’m considering a few different options: making a separate block for each month and assembling them at the end; starting a new centre somewhere else on the backing sheet and then gradually filling in the gaps (tempting but would lessen the impact of the one big log cabin), or having some of the longer strips be made up of smaller sections, thus allowing myself to spend a week or more building up a single strip. None of these is 100% appealing but right now I’m leaning towards the last option. I’ll give myself until the end of January to decide, after I’ve seen the final size of a month of strips.

The back is looking pretty fun, too:

25daily0113b

I’m stitching this with two colours of variegated crochet cotton I picked up in a thrift store. It’s partially a test to see if crochet cotton is strong enough to quilt with (so far I’m leaning towards NO). The twist feels quite different from the sashiko thread I’m more accustomed to using, and I don’t expect it to behave the same way so I’m tying knots rather than relying on the thread to swell and grab itself like sashiko thread does. I sure do love those colour changes though, especially in the orange.

daily stitch 2025, day one

25daily0101

This is the beginning of my 2025 daily stitch project.

I’ll admit it: I haven’t finished my 2024 daily stitch. I struggled with doing it every day, fell behind at several times during the year and at the end of the year, despite having many days off and very few plans, I did other things instead. I’m very close to completing it, though, and am on track to be ready to baste it up for quilting by next week, if I can settle on a fabric for the back.

For this year’s edition, I’m again focusing on applied fabric pieces, as my studio is overflowing with these fabrics I block printed for my masters thesis and other projects. I’ll start in the centre and spiral outward in a log cabin pattern. I’m aware that I’m setting myself up for larger and larger pieces each day, the daily time spent growing relentlessly over the year EVEN THOUGH I failed to keep up with just the same small amount of daily stitching last year. But this is Day One so I’m brimming with optimism. It’s going to be a year of COMMIT or DIE TRYING.

pintucks + pleats

On Monday afternoon I took an online workshop on the Quilty Nook (link: The Quilty Nook) with the amazing quilting teacher Heidi Parkes (link: Heidi Parkes) focused on adding texture to your quilts using pintucks and pleats. It turned out to be immensely fun and also maybe has helped me get unblocked on a new line of work I’ve been struggling to find focus with. I immediately realised the potential of this technique for drawing, and Wednesday evening I took a stack of fabric to life drawing club and made some loose contour portraits to try combining my drawing with stitching.

Here’s my first test piece, worked in red sashiko thread on a piece of thrifted cotton bedsheet dyed with tea and iron. This is the pintuck side:

pintuck5

And here’s the pleat side, with its wonderful clots of pooling red in all the tight little corners and cluster points:

pintuck51

Exciting, right? I’ve got around ten more sketches of faces on fabric to work with, plus a few hands and feet. I’m looking forward to seeing where this new method takes me, and of course am already bursting with too many ideas.